Thursday, April 7, 2016

Charming Cherries Quilt

Wow! What a crazy couple of months it has been for me! Shortly after my last post I was asked to serve as a youth leader in my church. It's always a blessing to be able to serve, but it is also a huge time commitment. And since I've never served in this position before, it's a pretty steep learning curve! 

I've never been a very timely blogger and sometimes I just feel like giving up on it, but I just can't! You see, there were a few precious blogs out there when I was learning to quilt that I always turned to for inspiration. And I want to give back to the quilting community that helped me so much as I was learning to machine quilt.

Since the demand on my time has increased and left me with next to no time for blogging, I have asked my 19yo daughter to help me out with my blog posts for a while. 

I'll introduce you to her on my next post. In the meantime, I'll show you a quilt I finished around a year ago...(Eek! Yes, that's how far behind I am on my blog posts!)

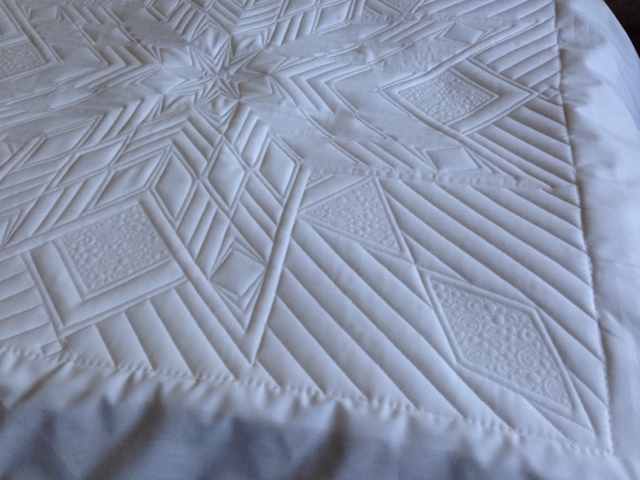
This cute quilt is a Quilt Soup Pattern called Charming Cherries. Isn't it cute?!


The quilting is simple custom quilting. Nothing dramatic but I do think the quilting enhances this fun quilt.


Monday, February 8, 2016

Pumpkin Seed Quilt

I wish I could say I recently quilted this gorgeous pumpkin seed quilt, but it's actually been over 6 months *gasp* since I finished this one...that's how behind I am with my blogging! The blogging struggle is real for me folks! I love sharing my work, I just find it hard to make myself sit down and blog! So, here I sit in my car, blogging on my phone while waiting for my son to finish soccer practice. Where there's a will, there's a way! 

I had so much fun quilting this quilt. It was all hand-guided. And I even included a little tutorial below on using a template when machine quilting.


To create my template, I drew a curved line on a square piece of cardboard using one of my curved rulers. I then folded that in half and cut along the line through both layers. Then I repeated the process for the other 2 sides of the square.


The reason I chose to make a template instead of just using my ruler is because not all the pumpkin seeds were spaced exactly even, so when I used my curved ruler and the pumpkin seeds as a point of reference, my diamond shapes were all wonky. Making a template gave me uniform diamond centers, and the unevenness was worked out with the small scalloped border, where it wasn't as noticeable. 

It was quick and easy to plop the template down in the center of the diamond, mark it with a disappearing-ink pen, then quilt along the marks using my ruler.


The design on the inner part of the diamond is made of different-sized loop-de-loops.


There are probably a zillion cute ways to quilt a pumpkin seed quilt. I hope you enjoyed seeing this one!


Tuesday, January 19, 2016

16 Patch Pink Baby Quilt

I just want to start out this blog post by saying Thank You to all of you who continue to read/view my blog! Despite the fact that my posts have been limited of late, you continue to show up. Thanks for not giving up on me. If you can't tell, I feel really guilty for not posting more. But, enough of the sob story. Let's get on with the good stuff!

My client, Sylvia, made this cute 16-patch (that's what I'm calling it, though I'm not sure if that is the correct pattern name) for her granddaughter. Sylvia is one of my clients who kindly gives me full creative control with the quilting, and after doing a bunch of edge-to-edge quilts I was ready to let my creative juices flow on this quilt.


All the quilting on this quilt was freehand (continuous curve/orange peel and feathers).


I think it turned out super cute!
 I'm always amazed at how the quilting can take a simple quilt and make it into a spectacular quilt.


The back...


Below is a closeup of the design I used in the white blocks. I'll be honest, I can't even remember how I came up with this design. And as much as I liked it, I still felt like it could use a little more. 


So, I did a little microquilting.

Below is a side-by-side comparison of the design with/without microquilting.

Some people feel less is more and others say quilt it to death.
 I don't think one is right and one is wrong. It's just a matter of opinion and preference. 
I'm a 'quilt-it-to-death' type of gal, so sometimes it's hard for me to simplify my quilting.

In the end, I had fun quilting this quilt, and my client loved it! 
Mission accomplished!


Monday, December 14, 2015

Vintage White Candlewick Quilt


Like so many of us, this client had a UFO that she had started around 20 years ago. 
Her daughter found the unfinished quilt and asked her mother to finish it for her.

It was a labor of love, but it will undoubtedly be treasured by her daughter and other posterity for years to come.


The candlewicking on this quilt is ornate, and it really is the focal point of the quilt, so my quilting needed to simply enhance the gorgeous design that was already there.


I was able to take a little more liberty in the plain white border.
 I used a repeating feather design (computerized) that I felt complemented the block design.


A picture of the back shows the simplicity of the quilting.


Monday, November 23, 2015

Free Motion Quilting a Spring Flowers Crib Quilt

A short and sweet post...

This precious baby quilt was designed by my client.

Her main request was to do detailed free motion quilting in the white area.
I don't get that request very often, so I thoroughly enjoyed doing it on this quilt.
I actually find it very therapeutic to do free motion filler work on quilts, as I don't have to think much about the design. I just let my muscle memory take control and before I know it it's done!


Sunday, October 18, 2015

Samantha's Star Quilt

I met Samantha at the Quilt Bliss retreat I attended last February
(although we had already been Instagram friends for a while).

Let me tell you about Samantha...

When I grow up I want to be like her!

As a person and a quilter, she totally rocks! 

This girl pieces more quilts in a month than I do in a year. And she is just one of the most genuine ladies I have ever met. (If you're on Instagram you can follow her @samanthaleeolsen). 

She said this was one of her earlier quilts, and she just hadn't been ready to get it quilted...
until she gave me the honor and full license to do whatever I wanted. So I went to town.


I have to admit, I loved the fact that it was a small wallhanging. Custom quilting large quilts can be overwhelming, but this was a joy.


And such a gorgeous back too!


Sunday, October 11, 2015

Moda Modern Building Blocks with Straight-Line Quilting


Has it really been over a month since I last blogged?!

I really have been doing a lot of quilting over here at my house, and the pics are piling up.
I need to get with the program!

Here's another version of the Moda Building Blocks quilt. 

I love straight-line quilting on this quilt. The simplicity of it shows off the colorful blocks. The last Moda Building Blocks I quilted was custom quilting and it took me around 40 hours to quilt. This quilt took less than a quarter of that time.

Don't get me wrong, I love the custom quilting I did on the first quilt, but I honestly love this look too. 

Sometimes deciding how to quilt a quilt is a matter of personal preference, sometimes it's a matter of finding out how the quilt will be used, and sometimes it's a matter of what the quilting budget allows. Really, whether custom or simple quilting, you can't lose! 


SITE DESIGN BY DESIGNER BLOGS